Pages

background

Followers

Tuesday 23 December 2014

Make Your Own... at Top Tip Tuesday...

Hello!!  Before we start, apologies, this is along one... I've been busy!!!

This fortnights Top Tip Tuesday Challenge is to Make your Own... and I decided to make my own background, as I've not done this in ages.

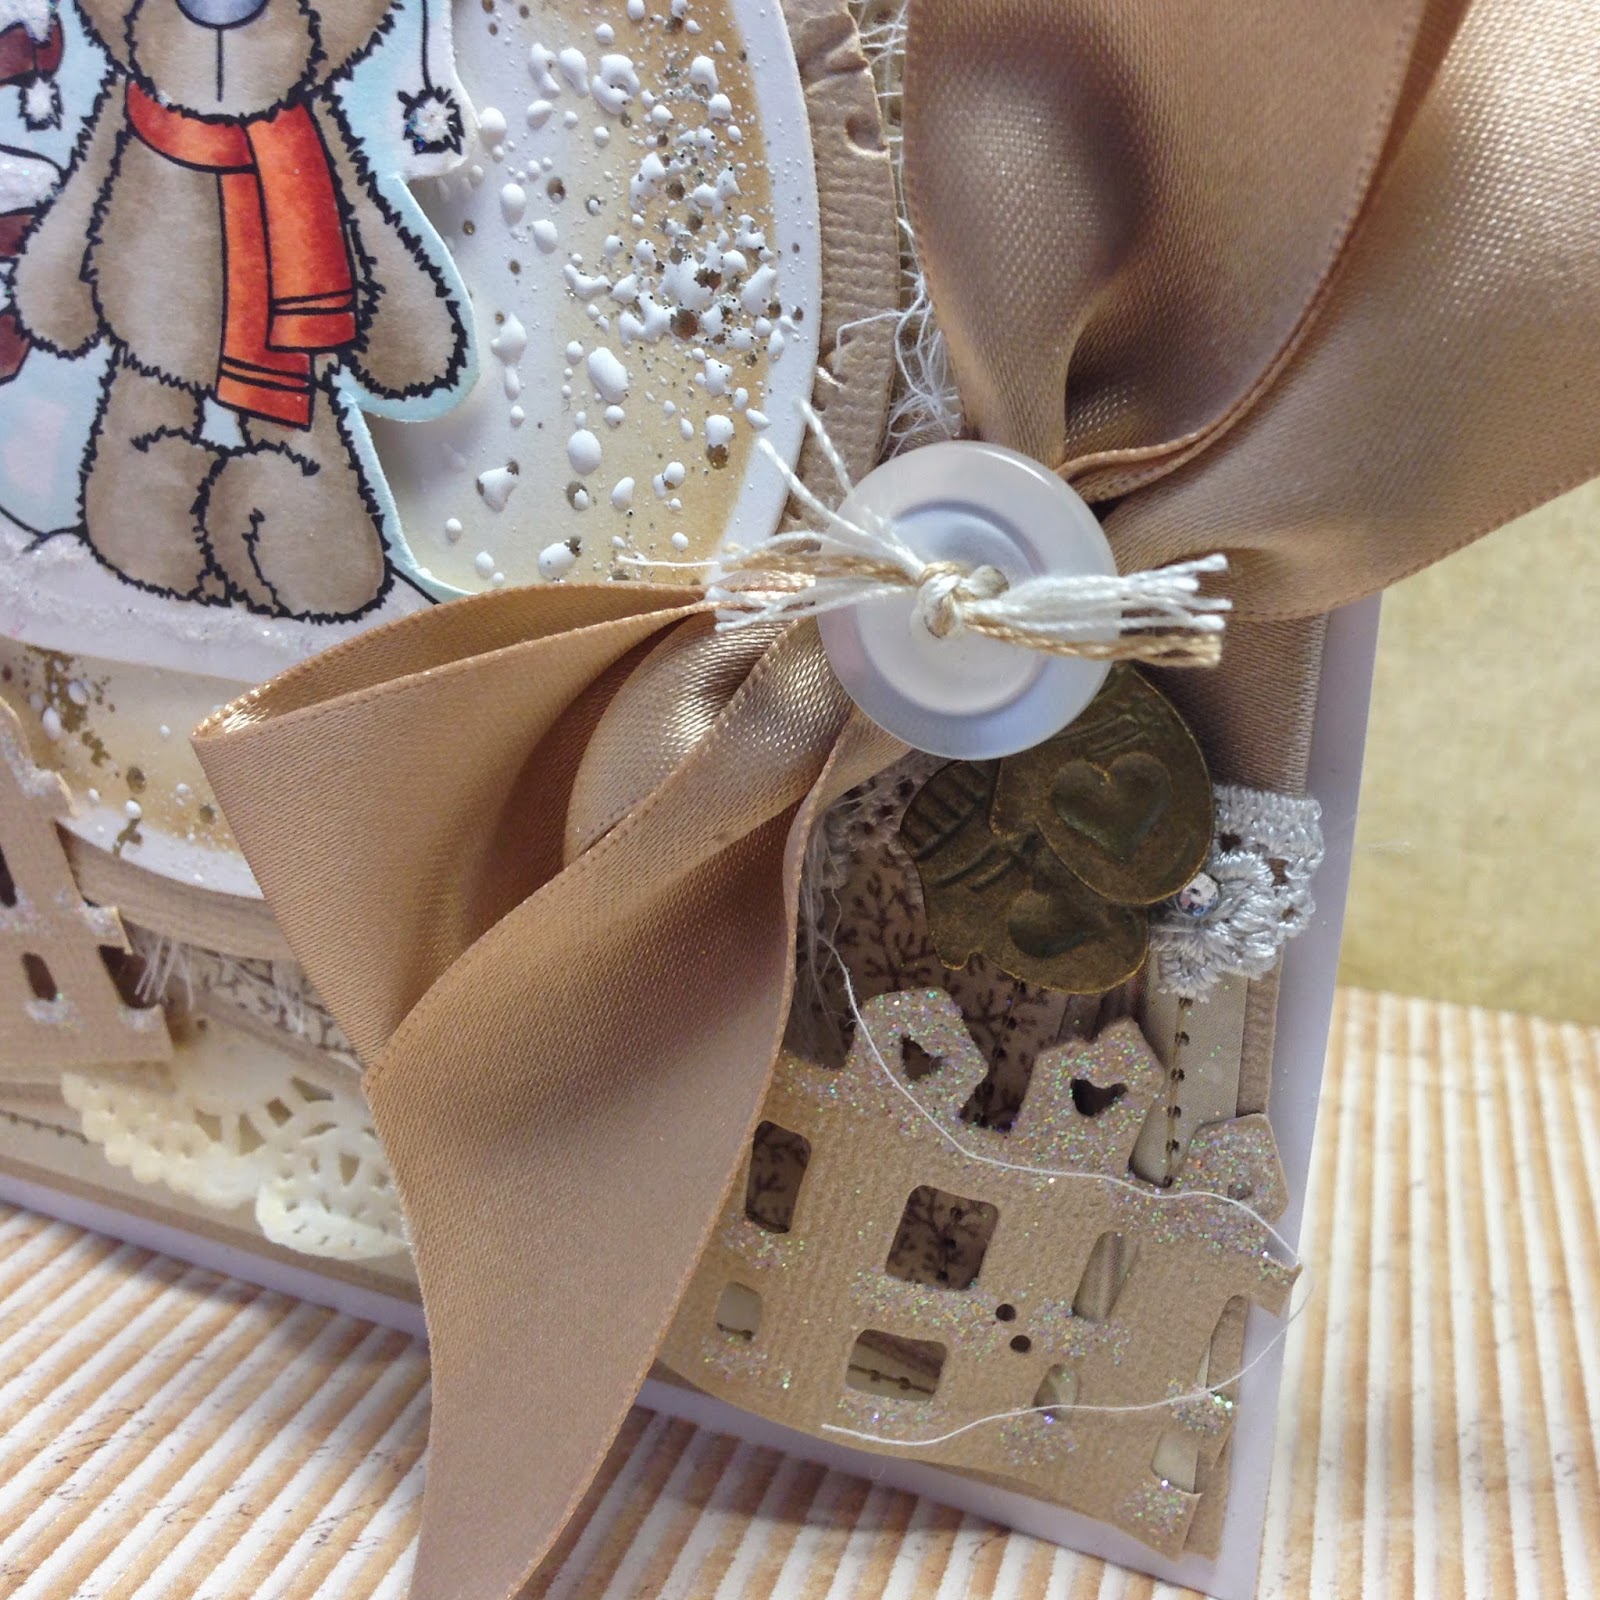
Actually, before I could do that, I had to make my own tag as I don't have a large tag die.  Actually it's pretty easy, I make it half as wide as I do tall and find those proportions work for me, regardless of if it's a big tag, or little!!


I searched out my snowflake stamps and randomly stamped them all over the kraft card stock with Burnt Sugar Ink from stamping up, then got busy with my brown toned distress inks (Tea Dye, Vintage Photom Frayed Burlap, Old Paper and Antique Linen)... Messy but worth it :-)  I then cut some snowflakes out using some snowflake dies, and added some gems here and there, some lace and organza and grosgrain ribbon, and topped it off with a Saturated Fairy image


I've been practicing colouring see through fabrics, and I think I'm getting there!!

Anyway, I have been feeling creative of late, so had the idea of making some of my own Christmas decorations... Before I knew it, I'd rolled and cookie cut numerous shapes, into which I stamped with various coloured inks... the kids joined in the fun too and made several decorations for their own trees... I should have got piccies of them busily cutting and stamping, both with their tongues out in concentration... Next year!!  Anyway, here are my ones...


Apologies for the piccie overload - not that they are very good - I thought it would look better to take pics on the tree, but the lights were a bit bright, and they look SOOO much better in real life.  As is always the way when you try something new (I've not played with clay since I was at school!!)  I got far too much clay - I tried both air drying and the stuff that you pop in a low oven for a while.  I still can't decide what I prefer - the air dry stuff curls a bit as it dries, but is easy to work with and you can get a nice embossed image with not too much pressure.  The oven dried stuff is a LOT harder to work and I had to stand up and really push to get a decent embossed image!  I also found that Distress Inks didn't work very well, but Momento and Stazon types worked well... I guess like with anything new, it's trial and error!  Now the tree is finally up and decorated with baubles and my home made decorations I think it looks lovely, and they would have cost an absolute fortune if I had bought them ready made :-)  Just goes to show that we all have stamps that can be used in so many ways, it just takes a bit of lateral thinking and a bit of bravery to do it!  What's the worst that could happen - they were rubbish and went in the bin! 

Anyway I made so many (it turns out clay goes a LONG way!!) that I had plenty left to give as gifts to some of my colleagues...  I wrapped them in Kraft, added organza ribbon and continued the homemade theme with a die cut tag which has been embossed in a sparkly white embossing powder... they look really good, and much more personal than those that we all pay a fortune for in the shops!  I went for a white on black image which apparently is quite trendy at the moment - my inner goth is delighted that black is the new black, while my inner girlie is over the moon that I can add a bit of sparkle :-)


Hope you can join in our final challenge of the year!!

Please may I enter these challenges

Card:

Decorations:

Gift tags:

Many thanks for stopping by

Sue xxx

Monday 22 December 2014

Another Christmas Fairy

How hard would you think it would be to get a new cartridge for my printer... impossible it would seem if today's little venture to get some new ones - which resulted in an epic fail - grrr... the very helpful man in one shop specialising in electrical items suggested that I buy a new printer... errr.... no... I'd like cartridges for the one that I bought four months ago from this shop please... Grrr!!!

Anyhoooo... this means that while I am waiting for the ones I have got on line to arrive, I am printer less... personally I am blaming the kids for the excessive ink usage on revising their Christmas lists... oooh... about 27 times each...  

So, I am having to use what I have got printed and/or stamped already in the mean time... which means yet another fairy... sorry!!!


I used the same layout as for last weeks Bear card, but changed the image, colours, papers etc... I just had the measurements in my head and it came together really easily for something that looks really fussy!


I used some shabby pink embossing powder on the panel behind the image - not that you can see it in the pictures, but as you move the card, you get glints of gold in the pink and it looks really pretty :-)  There's glitter too on the fence and on the image, not that my silly camera has picked it up very well... honestly it's not operator error :-)

Anyway, please may I enter these challenges

Thanks for stopping by, more tomorrow...

Sue xxx

Saturday 20 December 2014

Yet another Christmas Fairy...

Hello

Yes, I know I've been using this image quite a bit in the last week, but I like her, and my printer ran out of ink, and my momento has gone a bit dry (I don't think leaving the lid off of it the other week helped... oops!!), so I've been having to use what I had :-)


I popped her on a tag this time, distressed and with some shabby embossing powder added just for effect. 


I made another signpost with a drinking straw, and stamped the sentiment and popped some crackle paint over the top, although this hasn't shown up too well in the picture

Thanks for stopping by

Sue xxx


Friday 19 December 2014

Bearly in time for Christmas

Hello!!

I just had to colour Barry up again, although I kept this one a bit more simple than some of my recent cards :-) And yes, I know I've used this basic design several times before, but it works for fairly quick makes :-)


I debossed a panel to use as a background with a swirly snowflake embossing folder, and popped Barry on top :-)


Thanks for stopping by

Sue  xxx


Thursday 18 December 2014

Keeping it simple

Hello!

I've been making more CAS cards - not my normal style, but needs must!!


In all honesty this looks SOOO much better in real life than in this photo!! 

Anyway, a short and sweet post from me today... hope you are having a great week. more tomorrow I hope
Thanks for stopping by

Sue xx

Wednesday 17 December 2014

Fairy Magical Christmas

 Hello again ;-)

I have been colouring my new Saturated Canary Image again!  I know she isn't really a Christmas image, but I think I can get away with it!

I've teamed her with some more papers from Live and Love Crafts, and a snowflake die cut, plus a charms, lace, button, gems and ribbons from my stash


Just love colouring this image, and I'm getting there colouring transparent fabric :-)

I also love the velvet ric rac at the bottom, its scrummy!!


 During my last little spend up at Live and Love, I got some drinking straws.  I wasn't quite sure what to do with these, but they are more sturdy than the ones I remember from my childhood, and I thought lent themselves to being a signpost quite well!!


 Anyway, that's it from me today, hope you have a great week


Sue xx

Tuesday 16 December 2014

Beary Happy Christmas

Hello!

I know, three posts in three days, whatever next!!

Anyway... I thought I'd share this card


I have to say, this card is one of my favourites!   I've used more papers from Live and Love Crafts, along with another Barry the Bear image, which I have coloured out and popped on a die cut circle which has been distressed with distress inks, over stamped and dotted with shabby embossing powder.  The panel behind the circle has been de-bossed with an embossing folder


There's lace, a charm, ribbon, and a button on here too, and I have glittered parts of the fence die cut to make it look frosty too


The sentiment has been stamped on the edge of a spellbinders die cut. and the edges distressed, I punched snowflakes out and added pearls here and there, and stitched all of the main panels, and some cheesecloth behind the image panel


As I said, I'm really happy with how this one turned out :-)


Please may I enter these challenges

Thanks for stopping by

Sue xx

Monday 15 December 2014

Frosty Fairy

Hello... 

I've been busy in the last couple of days making all the Christmas cards I should have done already... I'm soooo up against it, but hey nothing like a bit of pressure to get the creative mojo going :-)


Here's the first one - using some lovely papers and lace from Live and Love Crafts, some silver organza ribbon, a die cut, with some dome shaped gems


and some chunky embossing powder, accenting the Saturated Canaary Image


and an oversized sentiment (Bo Bunny I think) from a couple of years ago... I put some glitter here and there, but it's not really visible in the picture... humf!!


oh and some pins, a charm and a sparkly button


I really love the feel of this one - really frosty and wintery


Please can I enter these challenges

Thanks for stopping by

Sue
xx

Sunday 14 December 2014

Simple Christmas Cards

Hello!!

I've been busy this weekend, bulk making Christmas cards... I left it a bit late, and have had to go down the quick and simple route for the majority of my cards.

I had some mini (well 9 x 9cm) card blanks in my drawer and I got cracking, bulk making cards...


I think they look lovely, with a background stamp stamped on top of the green card stock with Bundled Sage distress ink, and the sentiment added to the pennant (I don't have a pennant die cut, so cut my own - I did make a template first though, to make sure I got the dimensions right!) I found a couple of snowflake dies from years ago... I rarely reach for these, but they are a lot quicker than dies when making in bulk!  Some co-coordinating twine tied in a little bow finishes these off .  Actually, all the cardstock I used was scraps - far too small to be usable on a big project, so these have been made for next to nothing :-)

And once I got going I had 14 made quite quickly.  The bonus of hand cutting the pennants is that I had a reverse too!!


I really like how these turned out - quick, simple, but stunning...


Please may I enter these challenges


Thanks for stopping by, have a great week

Sue xxx

Tuesday 9 December 2014

Inspiration from your Home with Top Tip Tuesday

Hello... can you believe another two weeks have gone by and it's time for another challenge at Top Tip Tuesday... which is to be inspired from something in your home.


It's a bit more is more. with lace, ribbon, buttons, pearls, pins, charms, cheesecloth, a doily, and die cuts on here, along with some lovely papers from Live and Love Crafts. And my inspiration is this teddy, which is my son's (yes both of them have one each, it saves arguments)


His scarf , hat and nose, just reminded me of this little fellow from the now sadly closed Stamp Fairy, and I have fussy cut him out after colouring him with my copics, and added some lovely shabby embossing powder to the panel at the back.  Just a touch of glitter to his hat... just love him :-)


I decorated the inside to match, nothing fussy... I think I'd run out of steam after the front :-)


I tucked a hidden tag in here too


And stamped a Stampin' Up sentiment onto white card, cut it out and plonked a load of crackle glaze on top :-)


Thanks for stopping by

Sue xxx

Wednesday 3 December 2014

Skating Along...

Hello!!  How are you?  OK I hope?  It's got mighty chilly here in my little corner of the UK this week... brrrr...

Anyway, it's made me get cracking with my Christmas cards, starting with this little cutie from Lili of the Valley.  Again, its a fairly basic design, perfect for quick mass makes


The image is coloured with my trusty copics and blinged up just a little bit :-)


I will try to post again this week, but you know what I'm like :-)

Thanks for stopping by

Sue  xxx